Open Sql Server Management Studio
Right Click Databases - > Attach
Choose the .mdf file and you are done !!!
Tuesday 17 May 2011
Saturday 7 May 2011
Gmail, Facebook Style jQuery Chat amazing!!!
Demo
Please load the following links in different browsers otherwise it wont work:
[caption id="" align="alignright" width="245" caption="Image via CrunchBase"]
 [/caption]
Sample Chat User Swadesh
Sample Chat User Vimla
Sample Chat User Brijesh
Introduction
Everyone loves the gmail and facebook inline chat modules. This jQuery chat module enables you to seamlessly integrate Gmail/Facebook style chat into your existing website.

Features
1. Gmail style bottom right display of chat boxes
2. Keeps chat boxes open and stores state (data) even when pages are browsed/refreshed similar to Facebook
3. Displays “Sent at…” after 3 minutes of inactivity
4. Displays “X says…” & blinks chat boxes when window is not in focus
5. Minimize and close chat boxes
6. Auto-resize of text input box
7. Auto-scrolling of chat text
8. Auto-back-off polling policy (hits the server less-often when chat activity is low)
9. Extremely simple to integrate into existing site
Getting Started
First download the module (link below)
You must first create a mySQL table as below (or import db.txt provided in project files)
CREATE TABLE IF NOT EXISTS `chat` (
  `id` int(10) unsigned NOT NULL AUTO_INCREMENT,
  `from` varchar(255) NOT NULL DEFAULT '',
  `to` varchar(255) NOT NULL DEFAULT '',
  `message` text NOT NULL,
  `sent` datetime NOT NULL DEFAULT '0000-00-00 00:00:00',
  `recd` int(10) unsigned NOT NULL DEFAULT '0',
  PRIMARY KEY (`id`)
) ENGINE=InnoDB  DEFAULT CHARSET=latin1 AUTO_INCREMENT=539 ;


CREATE TABLE IF NOT EXISTS `users` (
  `uid` int(11) NOT NULL AUTO_INCREMENT,
  `username` varchar(30) DEFAULT NULL,
  `password` varchar(30) DEFAULT NULL,
  `email` varchar(100) DEFAULT NULL,
  `gender` varchar(8) NOT NULL,
  `dob` varchar(16) NOT NULL,
  `phone` varchar(20) NOT NULL,
  `profile_image` varchar(50) NOT NULL,
  PRIMARY KEY (`uid`)
) ENGINE=MyISAM  DEFAULT CHARSET=latin1 AUTO_INCREMENT=21 ;

--
-- Dumping data for table `users`
--

INSERT INTO `users` (`uid`, `username`, `password`, `email`, `gender`, `dob`, `phone`, `profile_image`) VALUES
(1, 'Swadesh', 'pass1', 'itswadesh@gmail.com', '', '', '', ''),
(2, 'Brijesh', 'pass1', 'brijesh@gmail.com', '', '', '', ''),
(3, 'Vimla', '', 'pass1', 'vimla@gmail.com', '', '', '');
Add the following scripts to your page template
<code><script type="text/javascript" src="js/jquery.js"></script>
<script type="text/javascript" src="js/chat.js"></script>
</code>
Add the following CSS to your page
<link type="text/css" rel="stylesheet" media="all" href="css/chat.css" />
<link type="text/css" rel="stylesheet" media="all" href="css/screen.css" /><!--[if lte IE 7]>
<link type="text/css" rel="stylesheet" media="all" href="css/screen_ie.css" />
<![endif]-->
Now in your list of users online, add “javascript:chatWith(’USERNAME’);” function where USERNAME is the username for that particular user who he/she wants to chat with.
Once that is done, edit chat.php and set your database parameters and try your website.
For better understanding, load 3 different browsers (internet explorer, firefox, safari) and point them to samplea.php, sampleb.php and samplec.php.
Click on “chat with john doe” link and watch the chat functionality come alive!
Inorder to integrate your existing website, you must place all your content between the “main_container” div tag.
Browser Compatibility
1. Firefox 2+
2. Internet Explorer 6+
3. Safari 2+
4. Opera 9+
Friday 6 May 2011
Create A Vertical Scrolling News Ticker With jQuery and jCarousel Lite
News Ticker is a fantastic way to present headlines or minor updates to your readers. The smooth scrolling effect will attract your readers and generate more clicks to your site.
There are a lot of great tutorials discussing on how to implement news ticker, however most of the tutorials that i found are not really suitable for a beginner. So, i decided to use jQuery and its plugin jCarousel Lite to create a simple yet powerful news ticker.
Why i choose jCarousel Lite? it is because jCarousel Lite is a tiny but powerful plugin. Furthermore, you can easily tweak/configure it to achieve different effects. News ticker is just a sample application for this plugin.
Let’s start to create our news ticker using jCarousel Lite. Download both jQuery and jCarousel Lite before we can start.

Step 1
Let’s create a blank index.htm file, and include jQuery and jCarousel Lite. Also, create a blank style.css file for later use.
<html>
<head>
<link rel="stylesheet" href="style.css" type="text/css" media="screen" />
<script src="jquery-latest.pack.js" type="text/javascript"></script>
<script src="jcarousellite_1.0.1c4.js" type="text/javascript"></script>
</head>
</html>
Step 2
In the same document, create a <div> and name it as “newsticker-demo”. Basically, this is the container for the news ticker. We will have another <div> class name “newsticker-jcarousellite”. Remember, this is very important and you will need to use the same class name when you configure jCarousel Lite.
Step 3
In the “newsticker-jcarousellite” <div>, create an <ul> element. Each news will be an individual <li> element. In this example, i had created 6 news, so i will have 6 <li> elements(but i am not going to show all). We will have the thumbnail float to the left, while the title and other information float to the right.
<li>
    <div>
        <a href="#"><img src="images/1.jpg"></a>
    </div>
    <div>
        <a href="http://www.vladstudio.com/wallpaper/?knight_lady">
        The Knight and the Lady</a>
        <span>Category: Illustrations</span>
    </div>
    <div></div>
</li>
Step 4
After you created your <li> element, it is the time for us to configure the jCarousel. Under the <head>, add these scripts:
<script type="text/javascript">
$(function() {
$(".newsticker-jcarousellite").jCarouselLite({
        vertical: true,
        visible: 3,
        auto:500,
        speed:1000
    });
});
</script>
The script itself is pretty straight forward. The “auto:500″ means it will auto-scroll every 500ms. There are a lot of options which you can configure easily. Refer the documentation for more information.
Step 5
Basically you had done everything, except styling your content. So, just copy and paste the scripts below in your style.css file.
* { margin:0; padding:0; }

#newsticker-demo {
width:310px;
background:#EAF4F5;
padding:5px 5px 0;
font-family:Verdana,Arial,Sans-Serif;
font-size:12px;
margin:20px auto;
}

#newsticker-demo a { text-decoration:none; }
#newsticker-demo img { border: 2px solid #FFFFFF; }

#newsticker-demo .title {
text-align:center;
font-size:14px;
font-weight:bold;
padding:5px;
}

.newsticker-jcarousellite { width:300px; }
.newsticker-jcarousellite ul li{ list-style:none; display:block; padding-bottom:1px; margin-bottom:5px; }
.newsticker-jcarousellite .thumbnail { float:left; width:110px; }
.newsticker-jcarousellite .info { float:right; width:190px; }
.newsticker-jcarousellite .info span.cat { display: block; font-size:10px; color:#808080; }.clear { clear: both; }
Finish!

The easiest method to add cache capability to your static webpage
In the C# code behind file write the following inside the Page_Load method
Response.Cache.SetExpires(DateTime.Now.AddYears(1));
In the head section of the page add the following
<meta http-equiv="expires" content="mon, 27 sep 2012 14:30:00 GMT"/>
Response.Cache.SetExpires(DateTime.Now.AddYears(1));
In the head section of the page add the following
<meta http-equiv="expires" content="mon, 27 sep 2012 14:30:00 GMT"/>
Thursday 5 May 2011
centralize the whole page content using css
#content
{
width: 800px;
margin-left:auto;
margin-right:auto;
}
{
width: 800px;
margin-left:auto;
margin-right:auto;
}
Caching in ASP.NET
Introduction
The majority [if not all] of the pages in a dynamic website are dynamic. That is, pages that are created on user request. As we all know, dynamic web pages help to provide dynamic content, customized for the user requesting the page [e.g.: the user's home page]. Dynamic pages also help provide dynamic content fetched from a changing data store without the need for the administrator to change the page content every time something changes in the data store [e.g.: Listing of books in a publisher's website]. The disadvantage is the overhead in creating the pages for every user request.
To overcome this, some websites have page creation engines which create all pages in one go and save them as HTML pages which are then served to the users. But this will only help in scenarios where the page content is the same for all requests [user-independent] as in the second example above. The listing of books is the same irrespective of the user requesting the page. Even if there is provision for listing books category wise by providing different category ID values through the querystring, the page output for a particular category of books is the same for all users.
ASP.NET provides support for "caching" which will help us solve this problem to a great extend. It can cache [store in memory] the output generated by a page and will serve this cached content for future requests. And this is useful only in the second scenario described earlier, where the page content is the same for all requests [user-independent]. The caching feature is customizable in various ways and we will see how we can do that as we go through this article.
Caching a page
In order to cache a page's output, we need to specify an
@OutputCache directive at the top of the page. The syntax is as shown below:<%@ OutputCache Duration=5 VaryByParam="None" %>
As you can see, there are two attributes to this directive. They are:
Duration- The time in seconds of how long the output should be cached. After the specified duration has elapsed, the cached output will be removed and page content generated for the next request. That output will again be cached for 10 seconds and the process repeats.VaryByParam- This attribute is compulsory and specifies the querystring parameters to vary the cache.In the above snippet, we have specified theVaryByParamattribute asNonewhich means the page content to be served is the same regardless of the parameters passed through the querystring [see Example 1 in the sample download].
If there are two requests to the same page with varying querystring parameters, e.g.: .../PageCachingByParam.aspx?id=12 and .../PageCachingByParam.aspx?id=15] and separate page content is generated for each of them, the directive should be: Collapse
<%@ OutputCache Duration=5 VaryByParam="id" %>
The page content for the two requests will each be cached for the time specified by theDurationattribute [see Example 2 in the sample download].
To specify multiple parameters, use semicolon to separate the parameter names. If we specify theVaryByParamattribute as*, the cached content is varied for all parameters passed through the querystring.
Some pages generate different content for different browsers. In such cases, there is provision to vary the cached output for different browsers. The
@OutputCache directive has to be modified to:<%@ OutputCache Duration=5 VaryByParam="id" VaryByCustom="browser" %>
This will vary the cached output not only for the browser but also its major version. I.e., IE5, IE 6, Netscape 4, Netscape 6 will all get different cached versions of the output.
Caching page fragments
Sometimes we might want to cache just portions of a page. For example, we might have a header for our page which will have the same content for all users. There might be some text/image in the header which might change everyday. In that case, we will want to cache this header for a duration of a day.
The solution is to put the header contents into a user control and then specify that the user control content should be cached. This technique is called fragment caching.
To specify that a user control should be cached, we use the
@OutputCache directive just like we used it for the page.<%@ OutputCache Duration=10 VaryByParam="None" %>
With the above directive, the user control content will be cached for the time specified by the
Duration attribute [10 secs]. Regardless of the querystring parameters and browser type and/or version, the same cached output is served. [See Example 3 in the download for a demonstration].Data Caching
ASP.NET also supports caching of data as objects. We can store objects in memory and use them across various pages in our application. This feature is implemented using the
Cache class. This cache has a lifetime equivalent to that of the application. Objects can be stored as name value pairs in the cache. A string value can be inserted into the cache as follows:Cache["name"]="Smitha";
The stored string value can be retrieved like this:
if (Cache["name"] != null)
    Label1.Text= Cache["name"].ToString();
[See example 4 for an illustration.]
To insert objects into the cache, the
Add method or different versions of the Insert method of the Cache class can be used. These methods allow us to use the more powerful features provided by the Cache class. One of the overloads of the Insert method is used as follows:Cache.Insert("Name", strName,
new CacheDependency(Server.MapPath("name.txt"),
DateTime.Now.AddMinutes(2), TimeSpan.Zero);The first two parameters are the key and the object to be inserted. The third parameter is of type
CacheDependency and helps us set a dependency of this value to the file named name.txt. So whenever this file changes, the value in the cache is removed. We can specify null to indicate no dependency. The fourth parameter specifies the time at which the value should be removed from cache. [See example 5 for an illustration.] The last parameter is the sliding expiration parameter which shows the time interval after which the item is to be removed from the cache after its last accessed time.The cache automatically removes the least used items from memory, when system memory becomes low. This process is called scavenging. We can specify priority values for items we add to the cache so that some items are given more priority than others:
Cache.Insert("Name", strName,
    new CacheDependency(Server.MapPath("name.txt"),
    DateTime.Now.AddMinutes(2), TimeSpan.Zero,
    CacheItemPriority.High, null);
The
CacheItemPriority enumeration has members to set various priority values. The CacheItemPriority.High assigns a priority level to an item so that the item is least likely to be deleted from the cache.Points of interest
- If there are old ASP pages in your website which use the
Response.Expiresproperty to cache page output, they can be retained as such. ASP.NET supports this property as well. - The
Insertmethod of theCacheclass will overwrite any existing item with the same key name. - The
CacheItemPriority.NotRemovablepriority value can be used withCache.Insertmethod to set the priority level of an item so that the item will not be removed from the cache during scavenging.
Conclusion
In this article, I have tried to provide an overview of the various options available for caching in ASP.NET. Elaborate explanations and details have not been provided to keep the article short.
Fragment caching can be done in a nested fashion with child controls having caching enabled. How to do this has not been covered as I have not tried it out myself. So also various overloads of the
Insert method of the Cache class has not been discussed here. I hope this article will be a good starting point for the readers to explore into the details of a wonderful feature available in ASP.NET.
Web Site Optimization: 13 Simple Steps
I've came across some websites like Facebook, gmail and Yahoo and always wonder "how these are so fast!!!!!!"
I searched some websites and blogs related to this and hand picked some of the following techniques which really worked for my new social N/W website.
The tutorial is divided into four parts:
The article is not going to explain Yahoo!’s performance rules in detail, so you’d do well to read through them on your own for a better understanding of their importance, the reasoning behind the rules, and how they came to be. Here’s the list of rules in question:
You can read about these rules on the Yahoo! Developer Network site. You can also check out the book “High Performance Web Sites” by Steve Souders, and the performance research articles on the YUI blog by Tenni Theurer.
Decrease Download Sizes
Decreasing download sizes isn’t even in Yahoo!’s list of rules — probably because it’s so obvious. However I don’t think it hurts to reiterate the point — let’s call it Rule #0.
When we look at a simple web page we see:
The assets are images, scripts, styles, and perhaps some external media such as Flash movies or Java applets (remember those?). So, when it comes to download sizes, you should aim to have all the assets as lightweight as possible — advice which also extends to the page’s HTML content. Creating lean HTML code often means using better (semantic) markup, which also overlaps with the SEO (search engine optimization) efforts that are a necessary part of the site creation process. As most professional web developers know, a key characteristic of good markup is that it only describes the content, not the presentation of the page (no layout tables!). Any layout or presentational elements should be moved to CSS.
Here’s an example of a good approach to HTML markup for a navigation menu:
This sort of markup should provide “hooks” to allow for the effective use of CSS and make the menu look however you want it to — whether that means adding fancy bullets, borders, or rollovers, or placing the menu items into a horizontal menu. The markup is minimal, which means there are fewer bytes to download; it’s semantic, meaning it describes the content (a navigation menu is a list of links); and finally, being minimal, it also gives you an SEO advantage: it’s generally agreed that search engines prefer a higher content-to-markup ratio in the pages that they index.
Once you’re sure your markup is lightweight and semantic, you should go through your assets and make sure they are also of minimal size. For example, check whether it’s possible to compress images more without losing too much quality, or to choose a different file format that gives you better compression. Tools such as PNGOUT and pngcrush are a good place to start.
Make Fewer HTTP Requests
Making fewer HTTP requests turns out to be the most important optimization technique, with the biggest impact. If your time is limited, and you can only complete one optimization task, pick this one. HTTP requests are generally the most “expensive” activity that the browser performs while displaying your page. Therefore, you should ensure that your page makes as few requests as possible.
How you can go about that, while maintaining the richness of your pages?
You’ve got the basics now. In summary, make your page and its assets smaller in size, and use fewer assets by combining them wherever you can. If you concentrate on this aspect of optimization only, you and your visitors will notice a significant improvement.
Now let’s explore some of the Yahoo! recommendations in more detail, and see what other optimizations can be made to improve performance.
Use a Content Delivery Network
A Content Delivery Network (CDN) is a network of servers in different geographical locations. Each server has a copy of a site’s files. When a visitor to your site requests a file, the file is delivered from the nearest server (or the one that’s experiencing the lightest load at the time).
This setup can have a significant impact on your page’s overall performance, but unfortunately, using a CDN can be pricey. As such, it’s probably not something you’d do for a personal blog, but it may be useful when a client asks you to build a site that’s likely to experience high volumes of traffic. Some of the most widely known CDN providers are Akamai and Amazon, through its S3 service.
There are some non-profit CDNs in the market; check the CDN Wikipedia article to see if your project might qualify to use one of them. For example, one free non-profit peer-to-peer CDN is Coral CDN, which is extremely easy to integrate with your site. For this CDN, you take a URL and append “nyud.net” to the hostname. Here’s an example:
becomes:
Host Assets on Different Domains but Reduce DNS Lookups
After your visitor’s browser has downloaded the HTML for a page and figured out that a number of components are also needed, it begins downloading those components. Browsers restrict the number of simultaneous downloads that can take place; as per the HTTP/1.1 specification, the limit is two assets per domain.
Because this restriction exists on a per-domain basis, you can use several domains (or simply use subdomains) to host your assets, thus increasing the number of parallel downloads. Most shared hosts will allow you to create subdomains. Even if your host places a limit on the number of subdomains you can create (some restrict you to a maximum of five), it’s not that important, as you won’t need to utilize too many subdomains to see some noticeable performance improvements.
However, as Rule #9 states, you should also reduce the number of DNS lookups, because these can also be expensive. For every domain or subdomain that hosts a page asset, the browser will need to make a DNS lookup. So the more domains you have, the more your site will be slowed down by DNS lookups. Yahoo!’s research suggests that two to four domains is an optimal number, but you can decide for yourself what’s best for your site.
As a general guideline, I’d suggest you use one domain to host HTML pages and two other domains for your assets. Here’s an example:
Different hosting providers will probably offer different interfaces for creating subdomains, and ideally they should provide you with an option to specify the directory that holds the files for the subdomain. For example, if your canonical domain is www.sitepoint.com, and it points to
However, some hosts may prevent you from creating subdomains, or may restrict your ability to point to particular locations on the file system. In such cases, your only real options is to physically copy the assets to the new location. Don’t be tempted to create some kind of redirect in this case — it will only make things worse, as it creates two requests for each image.
If your hosting provider doesn’t allow subdomains at all, you always have the option of buying more domains and using them purely to host assets — after all, that’s what a lot of big sites do. Yahoo! uses the domain yimg.com, Amazon has images-amazon.com, and SitePoint has sitepointstatic.com. If you own several sites, or manage the hosting of your client’s sites, you might consider buying two domains, such as yourdomain-i1.com and yourdomain-i2.com, and using them to host the components for all the sites you maintain.
Place Assets on a Cookie-free Domain
If you set a lot of cookies, the request headers for your pages will increase in size, since those cookies are sent with each request. Additionally, your assets probably don’t use the cookies, so all of this information could be repeatedly sent to the client for no reason. Sometimes, those headers may even be bigger than the size of the asset requested — these are extreme cases of course, but it happens. Consider downloading those small icons or smilies that are less than half a kB, and requesting them with 1kB worth of HTTP headers.
If you use subdomains to host your assets, you need to make sure that the cookies you set are for your canonical domain name (e.g. www.example.org) and not for the top-level domain name (e.g. example.org). This way, your asset subdomains will be cookie-free. If you’re attempting to improve the performance of an existing site, and you’ve already set your cookies on the top-level domain, you could consider the option of hosting assets on new domains, rather than subdomains.
Split the Assets Among Domains
It’s completely up to you which assets you decide to host on i1.example.org and which you decide to host on i2.example.org — there’s no clear directive on this point. Just make sure you don’t randomize the domain on each request, as this will cause the same assets to be downloaded twice — once from i1 and once from i2.
You could aim to split your assets evenly by file size, or by some other criterion that makes sense for your pages. You may also choose to put all content images (those that are included in your HTML with
The best way to decide on splitting assets is by experimentation; you can use Firebug‘s Net panel to monitor the sequence in which assets download, then decide how you should spread components across domains in order to speed up the download process.
Configure DNS Lookups on Forums and Blogs
Since you should aim to have no more than four DNS lookups per page, it may be tricky to integrate third-party content such as Flickr images or ads that are hosted on a third-party server. Also, hotlinking images (by placing on your page an
If your site contains user-generated content (as do forums, for example), you can’t easily prevent multiple DNS lookups, since users could potentially post images located anywhere on the Web. You could write a script that copies each image from a user’s post to your server, but that approach can get fairly complicated.
Aim for the low-hanging fruit. For example, in the phpBB forum software, you can configure whether users need to hotlink their avatar images or upload them to your server. In this case, uploaded avatars will result in better performance for your site.
Use the
For best performance, your static assets should be exactly that: static. This means that there should be no dynamically generated scripts or styles, or
Having assets that are entirely static allows you to set the
Setting the
The first of these directives enables the generation of the
If you want, you can even set an expiration date per file type:
For more information, check the Apache documentation on
Name Assets
The problem with the technique that we just looked at (setting the
The solution is to modify the asset’s name — but it comes with some maintenance hurdles. For example, if you have a few CSS definitions pointing to
You’ll need to come up with a naming convention to use when naming your assets. For example, you might:
There’s no one right answer here — your decision will be depend on your personal preference, the specifics of your pages, the size of the project and your team, and so on.
If you use CVS, here’s a little PHP function that can help you extract the version from a file stored in CVS:
Serve gzipped Content
Most modern browsers understand gzipped (compressed) content, so a well-performing page should aim to serve all of its content compressed. Since most images, swf files and other media files are already compressed, you don’t need to worry about compressing them.
You do, however, need to take care of serving compressed HTML, CSS, client-side scripts, and any other type of text content. If you make XMLHttpRequests to services that return XML (or JSON, or plain text), make sure your server gzips this content as well.
If you open the Net panel in Firebug (or use LiveHTTPHeaders or some other packet sniffer), you can verify that the content is compressed by looking for a Content-Encoding header in the response, as shown in the following example:
Example request:
Example response:
In this request, the browser informed the server that it understands gzip and deflate encodings (
There’s one gotcha when it comes to serving gzipped content: you must make sure that proxies do not get in your way. If an ISP’s proxy caches your gzipped content and serves it to all of its customers, chances are that someone with a browser that doesn’t support compression will receive your compressed content.
To avoid this you can use the
There is one additional problem here: some browsers (IE 5.5, IE 6 SP 1, for instance) claim they support gzip, but can actually experience problems reading it (as described on the Microsoft downloads site, and the support site). If you care about people using these browsers (they usually account for less than 1% of a site’s visitors) you can use a different header —
To gzip or to Deflate?
If you’re confused by the two
Make Sure you Send gzipped Content
Okay, now let’s see what you can do to start serving gzipped content in accordance with what your host allows.
Option 1: mod_gzip for Apache Versions Earlier than 2
If you’re using Apache 1.2 and 1.3, the mod_gzip module is available. To verify the Apache version, you can check Firebug’s Net panel and look for the Server response header of any request. If you can’t see it, check you provider’s documentation or create a simple PHP script to echo this information to the browser, like so:
In the
Okay, so we’ve established that we want to compress all text content, PHP script output, static HTML pages, JavaScripts and style sheets before sending them to the browser. To implement this with mod_gzip, create in the root directory of your site an
The first line enables mod_gzip. The next three lines set compression based on MIME-type. The next section does the same thing, but on the basis of file extension. The last line sets the
If you want to send the
Note that some hosting providers will not allow you to use the
This will also set the
Be aware that there might be a minimum size condition on gzip, so if your files are too small (less than 1kb, for example), they might not be gzipped even though you’ve configured everything correctly. If this problem occurs, your host has decided that the gzipping process overhead is unnecessary for very small files.
Option 2: mod_deflate for Apache 2.0
If your host runs Apache 2 you can use mod_deflate. Despite its name, mod_deflate also uses gzip compression. To configure mod_deflate, add the following directives to your
Option 3:
Ideally we’d like Apache to handle the gzipping of content, but unfortunately some hosting providers might not allow it. If your hosting provider is one of these, it might allow you to use custom
If you can’t use Apache’s mod_gzip or mod_deflate modules, you might still be able to compress your content using PHP. In order for this solution to work, you’ll have to configure your web server so that all static HTML, JavaScript and CSS files are processed by PHP. This means more overhead for the server, but depending on your host, it might be your only option.
Add the following directives in your
This will ensure that PHP will process these (otherwise static) files. If it doesn’t work, you can try renaming the files to have a
Now create a
This enables compression and sets the compression level to 6. Values for the compression level range from 0 to 9, where 9 is the best (and slowest) compression. The last line sets up a file called
The
Finally, create the file
This script will be executed before every file that has a
Option 3 (Variant 2): PHP Settings in
If your host allows you to set PHP settings in your
Looking at the modified example from above, we would have the same
Option 4: In-script Compression
If your hosting provider doesn’t allow you to use
If this is your only option, you’ll either be using an
As I indicated, this is the least favorable option of all — you should try Option 1 or 2 first, and if they don’t work, consider Option 3 or 4, or a combination of both, depending on what your host allows.
Once you’ve established the degree of freedom your host permits, you can use the technique that you’ve employed to compress your static files to implement all of your Apache-related settings. For example, earlier I showed you how to set the Expires header. Well, guess what? Some hosts won’t allow it. If you find yourself in this situation, you can use PHP’s header function to set the
To do so, you might add to your
Disable ETags
Compared to the potential hassles that can be encountered when implementing the rule above, the application of this rule is very easy. You just need to add the following to your
Note that this rule applies to sites that are in a server farm. If you’re using a shared host, you could skip this step, but I recommend that you do it regardless because:
Use CSS Sprites
Using a technique known as CSS sprites, you can combine several images into a single image, then use the CSS background-position property to show only the image you need. The technique is not intended for use with content images (those that appear in the HTML in
Let’s look at an example. We’ll take two images. The first is
The resulting image is often smaller in size than the sum of the two files’ sizes, because the overhead associated with an image file is included only once. To display the first image, we’d use the following CSS rule:
To display the second image, we’d use the following rule:
At first glance, this technique might look a bit strange, but it’s really useful for decreasing the number of HTTP requests. The more images you combine this way, the better, because you’re cutting the request overhead dramatically. For an example of this technique in use “in the wild”, check out this image, used on Yahoo!’s homepage, or this one from Google’s.
In order to produce sprite images quickly, without having to calculate pixel coordinates, feel free to use the CSS Sprites Generator tool that I’ve developed. And for more information about CSS sprites, be sure to read Dave Shea’s article, titled CSS Sprites: Image Slicing’s Kiss of Death.
Use Post-load Pre-loading and Inline Assets
If you’re a responsible web developer, you’re probably already adhering to the separation of concerns and using HTML for your content, CSS for presentation and JavaScript for behavior. While these distinct parts of a page should be kept in separate files at all times, for performance reasons you might sometimes consider breaking the rule on your index (home) page. The homepage should always be the fastest page on your site — many first-time visitors may leave your site, no matter what content it contains, if they find the homepage slow to load.
When a visitor arrives at your homepage with an empty cache, the fastest way to deliver the page is to have only one request and no separate components. This means having scripts and styles inline (gasp)! It’s actually possible to have inline images as well (although it’s not supported in IE) but that’s probably taking things too far. Apart from being semantically incorrect, using inline scripts and styles prevents those components from being cached, so a good strategy will be to load components in the background after the home page has loaded — a technique with the slightly confusing name of post-load preloading. Let’s see an example.
Let’s suppose that the file containing your homepage is named
Your strategy might be to take the part of the JavaScript that’s used by the homepage out of
Once again, this technique is used by some of the big boys: both Google and Yahoo! have inline scripts and styles on their homepages, and they also make use of post-load preloading. If you visit Google’s homepage, it loads some HTML and one single image — the logo. Then, once the home page has finished loading, there is a request to get the sprite image, which is not actually needed until the second page loads — the one displaying the search results.
The Yahoo search page performs conditional pre-loading — this page doesn’t automatically load additional assets, but waits for the user to start typing in the search box. Once you’ve begun typing, it’s almost guaranteed that you’ll submit a search query. And when you do, you’ll land on a search results page that contains some components that have already been cached for you.
Preloading an image can be done with a simple line of JavaScript:
For preloading JavaScript files, use the JavaScript include_DOM technique and create a new
Here’s the CSS version:
In the first example, the image is requested but never used, so it doesn’t affect the current page. In the second example, the script is added to the page, so as well as being downloaded, it will be parsed and executed. The same goes for the CSS — it, too, will be applied to the page. If this is undesirable, you can still pre-load the assets using XMLHttpRequest.
Before diving into the JavaScript code and micro-optimizing every function and every loop, let’s first look at what big-picture items we can tackle easily that might have a significant impact on a site’s performance. Here are some guidelines for improving the impact that JavaScript files have on your site’s performance:
Merge
As per the basic rules, you should aim for your JavaScripts to make as few requests as possible; ideally, this also means that you should have only one
While a single-file approach is recommended in most cases, sometimes you may derive some benefit from having two scripts — one for the functionality that’s needed as soon as the page loads, and another for the functionality that can wait for the page to load first. Another situation in which two files might be desirable is when your site makes use of a piece of functionality across multiple pages — the shared scripts could be stored in one file (and thus cached from page to page), and the scripts specific to that one page could be stored in the second file.
Minify or Obfuscate Scripts
Now that you’ve merged your scripts, you can go ahead and minify or obfuscate them. Minifying means removing everything that’s not necessary — such as comments and whitespace. Obfuscating goes one step further and involves renaming and rearranging functions and variables so that their names are shorter, making the script very difficult to read. Obfuscation is often used as a way of keeping JavaScript source a secret, although if your script is available on the Web, it can never be 100% secret. Read more about minification and obfuscation in Douglas Crockford’s helpful article on the topic.
In general, if you gzip the JavaScript, you’ll already have made a huge gain in file size, and you’ll only obtain a small additional benefit by minifying and/or obfuscating the script. On average, gzipping alone can result in savings of 75-80%, while gzipping and minifying can give you savings of 80-90%. Also, when you’re changing your code to minify or obfuscate, there’s a risk that you may introduce bugs. If you’re not overly worried about someone stealing your code, you can probably forget obfuscation and just merge and minify, or even just merge your scripts only (but always gzip them!).
An excellent tool for JavaScript minification is JSMin and it also has a PHP port, among others. One obfuscation tool is Packer — a free online tool that, incidentally, is used by jQuery.
Changing your code in order to merge and minify should become an extra, separate step in the process of developing your site. During development, you should use as many
Really simple, isn’t it? You can save it as
This will combine and minify the files
The script above is useful when you merge and minify as a step in the site deployment process. Another, lazier option is to do the same on the fly — check out Ed Eliot’s blog post, and this blog post by SitePoint’s Paul Annesley for some ideas.
Many third-party JavaScript libraries are provided in their uncompressed form as well as in a minified version. You can therefore download and use the minified versions provided by the library’s creator, and then only worry about your own scripts. Something to keep in mind is the licensing of any third-party library that you use. Even though you might have combined and minified all of your scripts, you should still retain the copyright notices of each library alongside the code.
Place Scripts at the Bottom of the Page
The third rule of thumb to follow regarding JavaScript optimization is that the script should be placed at the bottom of the page, as close to the ending
Placing the script at the bottom is a way to avoid this negative blocking effect. Another reason to have as few
Remove Duplicates
Another guideline regarding JavaScript is to avoid including the same script twice. It may sound like strange advice (why would you ever do this?) but it happens: if, for example, a large site used multiple server-side includes that included JavaScript files, it’s conceivable that two of these might double up. The duplicate script would cause the browser’s parsing engine to be started twice and possibly (in some IE versions) even request the file for the second time. Duplicate scripts might also be an issue when you’re using third party libraries. Let’s suppose you had a carousel widget and a photo gallery widget that you downloaded from different sites, and they both used jQuery. In this case you’d want to make sure that you didn’t include jQuery twice by mistake. Also, if you use YUI, make sure you don’t include a library twice by including, for example, the DOM utility (
Merge and Minify
For your CSS files you can follow the guidelines we discussed for JavaScripts: minify and merge all style sheets into a single file to minimize download size and the number of HTTP requests taking place. Merging all files into one is a trivial task, but the job of minification may be a bit harder, especially if you’re using CSS hacks to target specific browsers — since some hacks exploit parsing bugs in the browsers, they might also trick your minifier utility.
You may decide not to go through the hassle of minifying style sheets (and the associated re-testing after minification). After all, if you decide to serve the merged and gzipped style sheet, that’s already a pretty good optimization.
If you do decide to minify CSS, apart from the option of minifying manually (simply removing comments and whitespace), you can use some of the available tools, such as CSSTidy, PEAR’s HTML_CSS library (http://pear.php.net/package/HTML_CSS/), or SitePoint’s own Dust-me Selectors Firefox plugin.
Place Styles at the Top of the Page
Your single, gzipped (and optionally minified) style sheet is best placed at the beginning of the HTML file, in the
You might think about distributing images across different domains, though. Images linked from the CSS won’t be downloaded until later, so in the meantime, your page can use the available download window to request content images from the domain that hosts the CSS images and is temporarily “idle”.
Ban Expressions
IE allows JavaScript expressions in CSS, like this one:
You should avoid JavaScript expressions for a number of reasons. First of all, they’re not supported by all browsers. They also harm the “separation of concerns”. And, when it comes to performance, expressions are bad because they’re recalculated every time the page is rendered or resized, or simply when you roll your mouse over the page. There are ways to make expressions less expensive — you can cache values after they’re initially calculated, but you’re probably better off simply to avoid them.
A number of tools can help you in your performance optimization quest. Most importantly, you’d want to monitor what’s happening when the page is loaded, so that you can make informed decisions. Try these utilities:
Whew! If you’ve made it this far, you now know quite a lot about how to approach a site optimization project (and more importantly, how to build your next web site with performance in mind). Remember the general rule of thumb that, when it comes to optimization, you should concentrate on the items with the biggest impact, as opposed to “micro-optimizing”.
You may choose not to implement all the recommendations discussed above, but you can still make quite a difference by focusing on the really low-hanging fruit, such as:
I searched some websites and blogs related to this and hand picked some of the following techniques which really worked for my new social N/W website.
The tutorial is divided into four parts:
- basic optimization rules
- optimizing assets (images, scripts, and styles)
- optimizations specific to scripts
- optimizations specific to styles
Credits and Suggested Reading
The article is not going to explain Yahoo!’s performance rules in detail, so you’d do well to read through them on your own for a better understanding of their importance, the reasoning behind the rules, and how they came to be. Here’s the list of rules in question:
- Make fewer HTTP requests
- Use a Content Delivery Network
- Add an Expires header
- Gzip components
- Put CSS at the top
- Move scripts to the bottom
- Avoid CSS expressions
- Make JavaScript and CSS external
- Reduce DNS lookups
- Minify JavaScript
- Avoid redirects
- Remove duplicate scripts
- Configure ETags
// <![CDATA[
/*<![CDATA[*/// */
// ]]>
/*<![CDATA[*/// */
// ]]>
You can read about these rules on the Yahoo! Developer Network site. You can also check out the book “High Performance Web Sites” by Steve Souders, and the performance research articles on the YUI blog by Tenni Theurer.
Basic Optimization Rules
Decrease Download Sizes
Decreasing download sizes isn’t even in Yahoo!’s list of rules — probably because it’s so obvious. However I don’t think it hurts to reiterate the point — let’s call it Rule #0.
When we look at a simple web page we see:
- some HTML code
- different page components (assets) referenced by the HTML
The assets are images, scripts, styles, and perhaps some external media such as Flash movies or Java applets (remember those?). So, when it comes to download sizes, you should aim to have all the assets as lightweight as possible — advice which also extends to the page’s HTML content. Creating lean HTML code often means using better (semantic) markup, which also overlaps with the SEO (search engine optimization) efforts that are a necessary part of the site creation process. As most professional web developers know, a key characteristic of good markup is that it only describes the content, not the presentation of the page (no layout tables!). Any layout or presentational elements should be moved to CSS.
Here’s an example of a good approach to HTML markup for a navigation menu:
<ul id="menu"> <li><a href="home.html">Home</a></li> <li><a href="about.html">About</a></li> <li><a href="contact.html">Contact</a></li> </ul>This sort of markup should provide “hooks” to allow for the effective use of CSS and make the menu look however you want it to — whether that means adding fancy bullets, borders, or rollovers, or placing the menu items into a horizontal menu. The markup is minimal, which means there are fewer bytes to download; it’s semantic, meaning it describes the content (a navigation menu is a list of links); and finally, being minimal, it also gives you an SEO advantage: it’s generally agreed that search engines prefer a higher content-to-markup ratio in the pages that they index.
Once you’re sure your markup is lightweight and semantic, you should go through your assets and make sure they are also of minimal size. For example, check whether it’s possible to compress images more without losing too much quality, or to choose a different file format that gives you better compression. Tools such as PNGOUT and pngcrush are a good place to start.
Make Fewer HTTP Requests
Making fewer HTTP requests turns out to be the most important optimization technique, with the biggest impact. If your time is limited, and you can only complete one optimization task, pick this one. HTTP requests are generally the most “expensive” activity that the browser performs while displaying your page. Therefore, you should ensure that your page makes as few requests as possible.
How you can go about that, while maintaining the richness of your pages?
- Combine scripts and style sheets: Do you have a few
<a title="Look up the tag in the SitePoint HTML Reference." href="http://reference.sitepoint.com/html/script"><script>tags in your head? Well, merge the.jsfiles into one and save your visitors some round trips; then do the same with the CSS files. - Use image sprites: This technique allows you to combine several images into one and use CSS to show only the part of the image that’s needed. When you combine five or ten images into a single file, already you’re making a huge saving in the request/response overhead.
- Avoid redirects: a redirect adds another client-server round trip, so instead of processing your page immediately after receiving the initial response, the browser will have to make another request and wait for the second response.
- Avoid frames: if you use frames, the browser has to request at least three HTML pages, instead of just one — those of the frameset as well as each of the frames.
You’ve got the basics now. In summary, make your page and its assets smaller in size, and use fewer assets by combining them wherever you can. If you concentrate on this aspect of optimization only, you and your visitors will notice a significant improvement.
Now let’s explore some of the Yahoo! recommendations in more detail, and see what other optimizations can be made to improve performance.
Optimizing Assets
Use a Content Delivery Network
A Content Delivery Network (CDN) is a network of servers in different geographical locations. Each server has a copy of a site’s files. When a visitor to your site requests a file, the file is delivered from the nearest server (or the one that’s experiencing the lightest load at the time).
This setup can have a significant impact on your page’s overall performance, but unfortunately, using a CDN can be pricey. As such, it’s probably not something you’d do for a personal blog, but it may be useful when a client asks you to build a site that’s likely to experience high volumes of traffic. Some of the most widely known CDN providers are Akamai and Amazon, through its S3 service.
There are some non-profit CDNs in the market; check the CDN Wikipedia article to see if your project might qualify to use one of them. For example, one free non-profit peer-to-peer CDN is Coral CDN, which is extremely easy to integrate with your site. For this CDN, you take a URL and append “nyud.net” to the hostname. Here’s an example:
http://example.org/logo.pngbecomes:
http://example.org.nyud.net/logo.pngHost Assets on Different Domains but Reduce DNS Lookups
After your visitor’s browser has downloaded the HTML for a page and figured out that a number of components are also needed, it begins downloading those components. Browsers restrict the number of simultaneous downloads that can take place; as per the HTTP/1.1 specification, the limit is two assets per domain.
Because this restriction exists on a per-domain basis, you can use several domains (or simply use subdomains) to host your assets, thus increasing the number of parallel downloads. Most shared hosts will allow you to create subdomains. Even if your host places a limit on the number of subdomains you can create (some restrict you to a maximum of five), it’s not that important, as you won’t need to utilize too many subdomains to see some noticeable performance improvements.
However, as Rule #9 states, you should also reduce the number of DNS lookups, because these can also be expensive. For every domain or subdomain that hosts a page asset, the browser will need to make a DNS lookup. So the more domains you have, the more your site will be slowed down by DNS lookups. Yahoo!’s research suggests that two to four domains is an optimal number, but you can decide for yourself what’s best for your site.
As a general guideline, I’d suggest you use one domain to host HTML pages and two other domains for your assets. Here’s an example:
- www.sitepoint.com – hosts only HTML (and maybe content images)
- i1.sitepoint.com – hosts JS, CSS, and some images
- i2.sitepoint.com – hosts most of the site’s images
Different hosting providers will probably offer different interfaces for creating subdomains, and ideally they should provide you with an option to specify the directory that holds the files for the subdomain. For example, if your canonical domain is www.sitepoint.com, and it points to
/home/sitepoint/htdocs, ideally you should be able to create the subdomain i1.sitepoint.com (either via an administration control panel or by creating a symbolic link in the file system) and point it to the same folder, /home/sitepoint/htdocs. This way, you can keep all files in the same location, just as they are in your development environment, but reference them using a subdomain.However, some hosts may prevent you from creating subdomains, or may restrict your ability to point to particular locations on the file system. In such cases, your only real options is to physically copy the assets to the new location. Don’t be tempted to create some kind of redirect in this case — it will only make things worse, as it creates two requests for each image.
If your hosting provider doesn’t allow subdomains at all, you always have the option of buying more domains and using them purely to host assets — after all, that’s what a lot of big sites do. Yahoo! uses the domain yimg.com, Amazon has images-amazon.com, and SitePoint has sitepointstatic.com. If you own several sites, or manage the hosting of your client’s sites, you might consider buying two domains, such as yourdomain-i1.com and yourdomain-i2.com, and using them to host the components for all the sites you maintain.
Place Assets on a Cookie-free Domain
If you set a lot of cookies, the request headers for your pages will increase in size, since those cookies are sent with each request. Additionally, your assets probably don’t use the cookies, so all of this information could be repeatedly sent to the client for no reason. Sometimes, those headers may even be bigger than the size of the asset requested — these are extreme cases of course, but it happens. Consider downloading those small icons or smilies that are less than half a kB, and requesting them with 1kB worth of HTTP headers.
If you use subdomains to host your assets, you need to make sure that the cookies you set are for your canonical domain name (e.g. www.example.org) and not for the top-level domain name (e.g. example.org). This way, your asset subdomains will be cookie-free. If you’re attempting to improve the performance of an existing site, and you’ve already set your cookies on the top-level domain, you could consider the option of hosting assets on new domains, rather than subdomains.
Split the Assets Among Domains
It’s completely up to you which assets you decide to host on i1.example.org and which you decide to host on i2.example.org — there’s no clear directive on this point. Just make sure you don’t randomize the domain on each request, as this will cause the same assets to be downloaded twice — once from i1 and once from i2.
You could aim to split your assets evenly by file size, or by some other criterion that makes sense for your pages. You may also choose to put all content images (those that are included in your HTML with
<img /> tags) on i1 and all layout images (those referenced by CSS’s background-image:url()) on i2, although in some cases this solution may not be optimal. In such cases, the browser will download and process the CSS files and then, depending on which rules need to be applied, will selectively download only images that are needed by the style sheet. The result is that the images referenced by CSS may not download immediately, so the load on your asset servers may not be balanced.The best way to decide on splitting assets is by experimentation; you can use Firebug‘s Net panel to monitor the sequence in which assets download, then decide how you should spread components across domains in order to speed up the download process.
// <![CDATA[
/*<![CDATA[*/// */
// ]]>
/*<![CDATA[*/// */
// ]]>
Configure DNS Lookups on Forums and Blogs
Since you should aim to have no more than four DNS lookups per page, it may be tricky to integrate third-party content such as Flickr images or ads that are hosted on a third-party server. Also, hotlinking images (by placing on your page an
<img /> tag whose src attribute points to a file on another person’s server) not only steals bandwidth from the other site, but also harms your own page’s performance, causing an extra DNS lookup.If your site contains user-generated content (as do forums, for example), you can’t easily prevent multiple DNS lookups, since users could potentially post images located anywhere on the Web. You could write a script that copies each image from a user’s post to your server, but that approach can get fairly complicated.
Aim for the low-hanging fruit. For example, in the phpBB forum software, you can configure whether users need to hotlink their avatar images or upload them to your server. In this case, uploaded avatars will result in better performance for your site.
Use the
Expires HeaderFor best performance, your static assets should be exactly that: static. This means that there should be no dynamically generated scripts or styles, or
<a title="Look up the ![]() tag in the SitePoint HTML Reference." href="http://reference.sitepoint.com/html/img"><img>
tag in the SitePoint HTML Reference." href="http://reference.sitepoint.com/html/img"><img> tags pointing to scripts that generate dynamic images. If you had such a need — for example, you wanted to generate a graphic containing your visitor’s username — the dynamic generation could be taken “offline” and the result cached as a static image. In this example, you could generate the image once, when the member signs up. You could then store the image on the file system, and write the path to the image in your database. An alternative approach might involve scheduling an automated process (a cron job, in UNIX) that generates dynamic components and saves them as static files.Having assets that are entirely static allows you to set the
Expires header for those files to a date that is far in the future, so that when an asset is downloaded once, it’s cached by the browser and never requested again (or at least not for a very long time, as we’ll see in a moment).Setting the
Expires header in Apache is easy: add an .htaccess file that contains the following directives to the root folder of your i1 and i2 subdomains:ExpiresActive On ExpiresDefault "modification plus 10 years"The first of these directives enables the generation of the
Expires header. The second sets the expiration date to 10 years after the file’s modification date, which translates to 10 years after you copied the file to the server. You could also use the setting “access plus 10 years”, which will expire the file 10 years after the user requests the file for the first time.If you want, you can even set an expiration date per file type:
ExpiresActive On ExpiresByType application/x-javascript "modification plus 2 years" ExpiresByType text/css "modification plus 5 years"For more information, check the Apache documentation on
mod_expires.Name Assets
The problem with the technique that we just looked at (setting the
Expires header to a date that’s far into the future) occurs when you want to modify an asset on that page, such as an image. If you just upload the changed image to your web server, new visitors will receive the updated image, but repeat visitors won’t. They’ll see the old cached version, since you’ve already instructed their browser never to ask for this image again.The solution is to modify the asset’s name — but it comes with some maintenance hurdles. For example, if you have a few CSS definitions pointing to
img.png, and you modify the image and rename it to img2.png, you’ll have to locate all the points in your style sheets at which the file has been referenced, and update those as well. For bigger projects, you might consider writing a tool to do this for you automatically.You’ll need to come up with a naming convention to use when naming your assets. For example, you might:
- Append an epoch timestamp to the file name, e.g.
img_1185403733.png. - Use the version number from your source control system (cvs or svn for example), e.g.
img_1.1.png. - Manually increment a number in the file name (e.g. when you see a file named
img1.png, simply save the modified image asimg2.png).
There’s no one right answer here — your decision will be depend on your personal preference, the specifics of your pages, the size of the project and your team, and so on.
If you use CVS, here’s a little PHP function that can help you extract the version from a file stored in CVS:
function getVersion($file) { $cmd = 'cvs log -h %s'; $cmd = sprintf($cmd, $file); exec($cmd, $res); $version = trim(str_replace('head: ', '', $res[3])); return $version; } // example use $file = 'img.png'; $new_file = 'img_' . getVersion($file) . '.png';Serve gzipped Content
Most modern browsers understand gzipped (compressed) content, so a well-performing page should aim to serve all of its content compressed. Since most images, swf files and other media files are already compressed, you don’t need to worry about compressing them.
You do, however, need to take care of serving compressed HTML, CSS, client-side scripts, and any other type of text content. If you make XMLHttpRequests to services that return XML (or JSON, or plain text), make sure your server gzips this content as well.
If you open the Net panel in Firebug (or use LiveHTTPHeaders or some other packet sniffer), you can verify that the content is compressed by looking for a Content-Encoding header in the response, as shown in the following example:
Example request:
GET /2.2.2/build/utilities/utilities.js HTTP/1.1 Host: yui.yahooapis.com User-Agent: Mozilla/5.0 (Windows; U; Windows NT 5.1; en-US; rv:1.8.1.5) Gecko/20070713 Firefox/2.0.0.5 Accept-Encoding: gzip,deflateExample response:
HTTP/1.x 200 OK Last-Modified: Wed, 18 Apr 2007 17:36:33 GMT Vary: Accept-Encoding Content-Type: application/x-javascript Content-Encoding: gzip Cache-Control: max-age=306470616 Expires: Sun, 16 Apr 2017 00:01:52 GMT Date: Mon, 30 Jul 2007 21:18:16 GMT Content-Length: 22657 Connection: keep-aliveIn this request, the browser informed the server that it understands gzip and deflate encodings (
Accept-Encoding: gzip,deflate) and the server responded with gzip-encoded content (Content-Encoding: gzip).There’s one gotcha when it comes to serving gzipped content: you must make sure that proxies do not get in your way. If an ISP’s proxy caches your gzipped content and serves it to all of its customers, chances are that someone with a browser that doesn’t support compression will receive your compressed content.
To avoid this you can use the
Vary: Accept-Encoding response header to tell the proxy to cache this response only for clients that send the same Accept-Encoding request header. In the example above, the browser said it supports gzip and deflate, and the server responded with some extra information for any proxy between the server and client, saying that gzip-encoded content is okay for any client that sends the same Accept-Encoding content.There is one additional problem here: some browsers (IE 5.5, IE 6 SP 1, for instance) claim they support gzip, but can actually experience problems reading it (as described on the Microsoft downloads site, and the support site). If you care about people using these browsers (they usually account for less than 1% of a site’s visitors) you can use a different header —
Cache-Control: Private — which eliminates proxy caching completely. Another way to prevent proxy caching is to use the header Vary: *.To gzip or to Deflate?
If you’re confused by the two
Accept-Encoding values that browsers send, think of deflate as being just another method for encoding content that’s less popular among browsers. It’s also less efficient, so gzip is preferred.Make Sure you Send gzipped Content
Okay, now let’s see what you can do to start serving gzipped content in accordance with what your host allows.
Option 1: mod_gzip for Apache Versions Earlier than 2
If you’re using Apache 1.2 and 1.3, the mod_gzip module is available. To verify the Apache version, you can check Firebug’s Net panel and look for the Server response header of any request. If you can’t see it, check you provider’s documentation or create a simple PHP script to echo this information to the browser, like so:
<?php echo apache_get_version(); ?>In the
Server header signature, you might also be able to see the mod_gzip version, if it’s installed. It might look like something like this:Server: Apache/1.3.37 (Unix) mod_gzip/1.3.26.1a.....Okay, so we’ve established that we want to compress all text content, PHP script output, static HTML pages, JavaScripts and style sheets before sending them to the browser. To implement this with mod_gzip, create in the root directory of your site an
.htaccess file that includes the following:mod_gzip_on Yes mod_gzip_item_include mime ^application/x-javascript$ mod_gzip_item_include mime ^application/json$ mod_gzip_item_include mime ^text/.*$ mod_gzip_item_include file \.html$ mod_gzip_item_include file \.php$ mod_gzip_item_include file \.js$ mod_gzip_item_include file \.css$ mod_gzip_item_include file \.txt$ mod_gzip_item_include file \.xml$ mod_gzip_item_include file \.json$ Header append Vary Accept-EncodingThe first line enables mod_gzip. The next three lines set compression based on MIME-type. The next section does the same thing, but on the basis of file extension. The last line sets the
Vary header to include the Accept-Encoding value.If you want to send the
Vary: * header, use:Header set Vary *Note that some hosting providers will not allow you to use the
Header directive. If this is the case, hopefully you should be able to substitute the last line with this one:mod_gzip_send_vary OnThis will also set the
Vary header to Accept-Encoding.Be aware that there might be a minimum size condition on gzip, so if your files are too small (less than 1kb, for example), they might not be gzipped even though you’ve configured everything correctly. If this problem occurs, your host has decided that the gzipping process overhead is unnecessary for very small files.
Option 2: mod_deflate for Apache 2.0
If your host runs Apache 2 you can use mod_deflate. Despite its name, mod_deflate also uses gzip compression. To configure mod_deflate, add the following directives to your
.htaccess file:AddOutputFilterByType DEFLATE text/html text/css text/plain text/xml application/x-javascript application/json Header append Vary Accept-Encoding// <![CDATA[
/*<![CDATA[*/// */
// ]]>
/*<![CDATA[*/// */
// ]]>
Option 3:
php.iniIdeally we’d like Apache to handle the gzipping of content, but unfortunately some hosting providers might not allow it. If your hosting provider is one of these, it might allow you to use custom
php.ini files. If you place a php.ini file in a directory, it overwrites PHP configuration settings for this directory and its subdirectories.If you can’t use Apache’s mod_gzip or mod_deflate modules, you might still be able to compress your content using PHP. In order for this solution to work, you’ll have to configure your web server so that all static HTML, JavaScript and CSS files are processed by PHP. This means more overhead for the server, but depending on your host, it might be your only option.
Add the following directives in your
.htaccess file:AddHandler application/x-httpd-php .css AddHandler application/x-httpd-php .html AddHandler application/x-httpd-php .jsThis will ensure that PHP will process these (otherwise static) files. If it doesn’t work, you can try renaming the files to have a
.php extension (like example.js.php, and so on) to achieve the same result.Now create a
php.ini file in the same directory with the following content:[PHP] zlib.output_compression = On zlib.output_compression_level = 6 auto_prepend_file = "pre.php" short_open_tag = 0This enables compression and sets the compression level to 6. Values for the compression level range from 0 to 9, where 9 is the best (and slowest) compression. The last line sets up a file called
pre.php to be executed at the beginning of every script, as if you had typed <?php include "pre.php"; ?> at the top of every script. You’ll need this file in order to set Content-Type headers, because some browsers might not like it when you send a CSS file that has, for example, a text/html content type header.The
short_open_tag setting is there to disable PHP short tags (<? ... ?>, as compared to <?php ... ?>). This is important because PHP will attempt to treat the <?xml tag in your HTML as PHP code.Finally, create the file
pre.php with the following content:<?php $path = pathinfo($_SERVER['SCRIPT_NAME']); if ($path['extension'] == 'css') { header('Content-type: text/css'); } if ($path['extension'] == 'js') { header('Content-type: application/x-javascript'); } ?>This script will be executed before every file that has a
.php, .html, .js or .css file extension. For HTML and PHP files, the default Content-Type text/html is okay, but for JavaScript and CSS files, we change it using PHP’s header function.Option 3 (Variant 2): PHP Settings in
.htaccessIf your host allows you to set PHP settings in your
.htaccess file, then you no longer need to use php.ini file to configure your compression settings. Instead, set the PHP setting in .htaccess using php_value (and php_flag).Looking at the modified example from above, we would have the same
pre.php file, no php.ini file, and a modified .htaccess that contained the following directives:AddHandler application/x-httpd-php .css AddHandler application/x-httpd-php .html AddHandler application/x-httpd-php .js php_flag zlib.output_compression on php_value zlib.output_compression_level 6 php_value auto_prepend_file "pre.php" php_flag short_open_tag offOption 4: In-script Compression
If your hosting provider doesn’t allow you to use
php_value in your .htaccess file, nor do they allow you to use a custom php.ini file, your last resort is to modify the scripts to manually include the common pre.php file that will take care of the compression. This is the least-preferred option, but sometimes you may have no other alternative.If this is your only option, you’ll either be using an
.htaccess file that contains the directives outlined in Option 3 above, or you’ll have had to rename every .js and .css file (and .xml, .html, etc.) to have a .php extension. At the top of every file, add <?php include "pre.php"; ?> and create a file called pre.php that contains the following content:<?php ob_start("ob_gzhandler"); $path = pathinfo($_SERVER['SCRIPT_NAME']); if ($path['extension'] == 'css') { header('Content-type: text/css'); } if ($path['extension'] == 'js') { header('Content-type: application/x-javascript'); } ?>As I indicated, this is the least favorable option of all — you should try Option 1 or 2 first, and if they don’t work, consider Option 3 or 4, or a combination of both, depending on what your host allows.
Once you’ve established the degree of freedom your host permits, you can use the technique that you’ve employed to compress your static files to implement all of your Apache-related settings. For example, earlier I showed you how to set the Expires header. Well, guess what? Some hosts won’t allow it. If you find yourself in this situation, you can use PHP’s header function to set the
Expires header from your PHP script.To do so, you might add to your
pre.php file something like this:<?php header("Expires: Mon, 25 Dec 2017 05:00:00 GMT"); ?>Disable ETags
Compared to the potential hassles that can be encountered when implementing the rule above, the application of this rule is very easy. You just need to add the following to your
.htaccess file:FileETags noneNote that this rule applies to sites that are in a server farm. If you’re using a shared host, you could skip this step, but I recommend that you do it regardless because:
- Hosts change their machines for internal purposes.
- You may change hosts.
- It’s so simple.
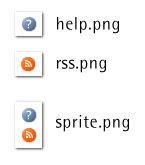
Use CSS Sprites
Using a technique known as CSS sprites, you can combine several images into a single image, then use the CSS background-position property to show only the image you need. The technique is not intended for use with content images (those that appear in the HTML in
<img /> tags, such as photos in a photo gallery), but is intended for use with ornamental and decorative images. These images will not affect the fundamental usability of the page, and are usually referenced from a style sheet in order to keep the HTML lean (Rule #0).Let’s look at an example. We’ll take two images. The first is
help.png; the second is rss.png. From these, we’ll create a third image, sprite.png, which contains both images.The resulting image is often smaller in size than the sum of the two files’ sizes, because the overhead associated with an image file is included only once. To display the first image, we’d use the following CSS rule:
#help { background-image: url(sprite.png); background-position: -8px -8px; width: 16px; height: 16px; }To display the second image, we’d use the following rule:
#rss { background-image: url(sprite.png); background-position: -8px -40px; width: 16px; height: 16px; }At first glance, this technique might look a bit strange, but it’s really useful for decreasing the number of HTTP requests. The more images you combine this way, the better, because you’re cutting the request overhead dramatically. For an example of this technique in use “in the wild”, check out this image, used on Yahoo!’s homepage, or this one from Google’s.
In order to produce sprite images quickly, without having to calculate pixel coordinates, feel free to use the CSS Sprites Generator tool that I’ve developed. And for more information about CSS sprites, be sure to read Dave Shea’s article, titled CSS Sprites: Image Slicing’s Kiss of Death.
Use Post-load Pre-loading and Inline Assets
If you’re a responsible web developer, you’re probably already adhering to the separation of concerns and using HTML for your content, CSS for presentation and JavaScript for behavior. While these distinct parts of a page should be kept in separate files at all times, for performance reasons you might sometimes consider breaking the rule on your index (home) page. The homepage should always be the fastest page on your site — many first-time visitors may leave your site, no matter what content it contains, if they find the homepage slow to load.
When a visitor arrives at your homepage with an empty cache, the fastest way to deliver the page is to have only one request and no separate components. This means having scripts and styles inline (gasp)! It’s actually possible to have inline images as well (although it’s not supported in IE) but that’s probably taking things too far. Apart from being semantically incorrect, using inline scripts and styles prevents those components from being cached, so a good strategy will be to load components in the background after the home page has loaded — a technique with the slightly confusing name of post-load preloading. Let’s see an example.
Let’s suppose that the file containing your homepage is named
home.html, that numerous other HTML files containing content are scattered throughout your site, and that all of these content pages use a JavaScript file, mystuff.js, of which only a small part is needed by the homepage.Your strategy might be to take the part of the JavaScript that’s used by the homepage out of
mystuff.js and place it inline in home.html. Then, once home.html has completed loading, make a behind-the-scenes request to pre-load mystuff.js. This way, when the user hits one of your content pages, the JavaScript has already been delivered to the browser and cached.Once again, this technique is used by some of the big boys: both Google and Yahoo! have inline scripts and styles on their homepages, and they also make use of post-load preloading. If you visit Google’s homepage, it loads some HTML and one single image — the logo. Then, once the home page has finished loading, there is a request to get the sprite image, which is not actually needed until the second page loads — the one displaying the search results.
The Yahoo search page performs conditional pre-loading — this page doesn’t automatically load additional assets, but waits for the user to start typing in the search box. Once you’ve begun typing, it’s almost guaranteed that you’ll submit a search query. And when you do, you’ll land on a search results page that contains some components that have already been cached for you.
Preloading an image can be done with a simple line of JavaScript:
new Image().src='image.png';For preloading JavaScript files, use the JavaScript include_DOM technique and create a new
<a title="Look up the tag in the SitePoint HTML Reference." href="http://reference.sitepoint.com/html/script"><script> tag, like so:var js = document.createElement('script'); js.src = 'mysftuff.js'; document.getElementsByTagName('head')[0].appendChild(js);Here’s the CSS version:
var css = document.createElement('link'); css.href = 'mystyle.css'; css.rel = 'stylesheet'; document.getElementsByTagName('head')[0].appendChild(css);In the first example, the image is requested but never used, so it doesn’t affect the current page. In the second example, the script is added to the page, so as well as being downloaded, it will be parsed and executed. The same goes for the CSS — it, too, will be applied to the page. If this is undesirable, you can still pre-load the assets using XMLHttpRequest.
JavaScript Optimizations
Before diving into the JavaScript code and micro-optimizing every function and every loop, let’s first look at what big-picture items we can tackle easily that might have a significant impact on a site’s performance. Here are some guidelines for improving the impact that JavaScript files have on your site’s performance:
- Merge
.jsfiles. - Minify or obfuscate scripts.
- Place scripts at the bottom of the page.
- Remove duplicates.
// <![CDATA[
/*<![CDATA[*/// */
// ]]>
/*<![CDATA[*/// */
// ]]>
Merge
.js FilesAs per the basic rules, you should aim for your JavaScripts to make as few requests as possible; ideally, this also means that you should have only one
.js file. This task is as simple as taking all .js script files and placing them into a single file.While a single-file approach is recommended in most cases, sometimes you may derive some benefit from having two scripts — one for the functionality that’s needed as soon as the page loads, and another for the functionality that can wait for the page to load first. Another situation in which two files might be desirable is when your site makes use of a piece of functionality across multiple pages — the shared scripts could be stored in one file (and thus cached from page to page), and the scripts specific to that one page could be stored in the second file.
Minify or Obfuscate Scripts
Now that you’ve merged your scripts, you can go ahead and minify or obfuscate them. Minifying means removing everything that’s not necessary — such as comments and whitespace. Obfuscating goes one step further and involves renaming and rearranging functions and variables so that their names are shorter, making the script very difficult to read. Obfuscation is often used as a way of keeping JavaScript source a secret, although if your script is available on the Web, it can never be 100% secret. Read more about minification and obfuscation in Douglas Crockford’s helpful article on the topic.
In general, if you gzip the JavaScript, you’ll already have made a huge gain in file size, and you’ll only obtain a small additional benefit by minifying and/or obfuscating the script. On average, gzipping alone can result in savings of 75-80%, while gzipping and minifying can give you savings of 80-90%. Also, when you’re changing your code to minify or obfuscate, there’s a risk that you may introduce bugs. If you’re not overly worried about someone stealing your code, you can probably forget obfuscation and just merge and minify, or even just merge your scripts only (but always gzip them!).
An excellent tool for JavaScript minification is JSMin and it also has a PHP port, among others. One obfuscation tool is Packer — a free online tool that, incidentally, is used by jQuery.
Changing your code in order to merge and minify should become an extra, separate step in the process of developing your site. During development, you should use as many
.js files as you see fit, and then when the site is ready to go live, substitute your “normal” scripts with the merged and minified version. You could even develop a tool to do this for you. Below, I’ve included an example of a small utility that does just this. It’s a command-line script that uses the PHP port of JSMin:<?php include 'jsmin.php'; array_shift($argv); foreach ($argv AS $file) { echo '/* ', $file, ' */'; echo JSMin::minify(file_get_contents($file)), "\n"; } ?>Really simple, isn’t it? You can save it as
compress.php and run it as follows:$ php compress.php source1.js source2.js source3.js > result.jsThis will combine and minify the files
source1.js, source2.js, and source3.js into one file, called result.js.The script above is useful when you merge and minify as a step in the site deployment process. Another, lazier option is to do the same on the fly — check out Ed Eliot’s blog post, and this blog post by SitePoint’s Paul Annesley for some ideas.
Many third-party JavaScript libraries are provided in their uncompressed form as well as in a minified version. You can therefore download and use the minified versions provided by the library’s creator, and then only worry about your own scripts. Something to keep in mind is the licensing of any third-party library that you use. Even though you might have combined and minified all of your scripts, you should still retain the copyright notices of each library alongside the code.
Place Scripts at the Bottom of the Page
The third rule of thumb to follow regarding JavaScript optimization is that the script should be placed at the bottom of the page, as close to the ending
</body> tag as possible. The reason? Well, due to the nature of the scripts (they could potentially change anything on a page), browsers block all downloads when they encounters a <a title="Look up the tag in the SitePoint HTML Reference." href="http://reference.sitepoint.com/html/script"><script> tag. So until a script is downloaded and parsed, no other downloads will be initiated.Placing the script at the bottom is a way to avoid this negative blocking effect. Another reason to have as few
<a title="Look up the tag in the SitePoint HTML Reference." href="http://reference.sitepoint.com/html/script"><script> tags as possible is that the browser initiates its JavaScript parsing engine for every script it encounters. This can be expensive, and therefore parsing should ideally only occur once per page.Remove Duplicates
Another guideline regarding JavaScript is to avoid including the same script twice. It may sound like strange advice (why would you ever do this?) but it happens: if, for example, a large site used multiple server-side includes that included JavaScript files, it’s conceivable that two of these might double up. The duplicate script would cause the browser’s parsing engine to be started twice and possibly (in some IE versions) even request the file for the second time. Duplicate scripts might also be an issue when you’re using third party libraries. Let’s suppose you had a carousel widget and a photo gallery widget that you downloaded from different sites, and they both used jQuery. In this case you’d want to make sure that you didn’t include jQuery twice by mistake. Also, if you use YUI, make sure you don’t include a library twice by including, for example, the DOM utility (
dom-min.js), the Event utility (event-min.js) and the utilities.js library, which contains both DOM and Event.CSS Optimizations
Merge and Minify
For your CSS files you can follow the guidelines we discussed for JavaScripts: minify and merge all style sheets into a single file to minimize download size and the number of HTTP requests taking place. Merging all files into one is a trivial task, but the job of minification may be a bit harder, especially if you’re using CSS hacks to target specific browsers — since some hacks exploit parsing bugs in the browsers, they might also trick your minifier utility.
You may decide not to go through the hassle of minifying style sheets (and the associated re-testing after minification). After all, if you decide to serve the merged and gzipped style sheet, that’s already a pretty good optimization.
If you do decide to minify CSS, apart from the option of minifying manually (simply removing comments and whitespace), you can use some of the available tools, such as CSSTidy, PEAR’s HTML_CSS library (http://pear.php.net/package/HTML_CSS/), or SitePoint’s own Dust-me Selectors Firefox plugin.
Place Styles at the Top of the Page
Your single, gzipped (and optionally minified) style sheet is best placed at the beginning of the HTML file, in the
<a title="Look up the tag in the SitePoint HTML Reference." href="http://reference.sitepoint.com/html/head"><head> section — which is where you’d usually put it anyway. The reason is that most browsers (Opera is an exception) won’t render anything on the page until the all the style sheets are duly downloaded and parsed. Additionally, none of the images referenced from the CSS will be downloaded unless the CSS parsing is complete. So it’s better to include the CSS as early on the page as possible.You might think about distributing images across different domains, though. Images linked from the CSS won’t be downloaded until later, so in the meantime, your page can use the available download window to request content images from the domain that hosts the CSS images and is temporarily “idle”.
Ban Expressions
IE allows JavaScript expressions in CSS, like this one:
#content { left: expression(document.body.offsetWidth) }You should avoid JavaScript expressions for a number of reasons. First of all, they’re not supported by all browsers. They also harm the “separation of concerns”. And, when it comes to performance, expressions are bad because they’re recalculated every time the page is rendered or resized, or simply when you roll your mouse over the page. There are ways to make expressions less expensive — you can cache values after they’re initially calculated, but you’re probably better off simply to avoid them.
Tools for Performance Optimization
A number of tools can help you in your performance optimization quest. Most importantly, you’d want to monitor what’s happening when the page is loaded, so that you can make informed decisions. Try these utilities:
- Firebug’s Net panel for Firefox, at http://www.getfirebug.com
- YSlow, Yahoo!’s performance extension to Firebug, at http://developer.yahoo.com/yslow/
- LiveHTTP Headers for Firefox, at http://livehttpheaders.mozdev.org/
- Fiddler — for IE, but also a general-purpose packet sniffer, at http://www.fiddlertool.com/fiddler/
- HTTPWatch for IE (commercial, free version), at http://www.httpwatch.com/
- Web Inspector for Safari, at http://webkit.org/blog/?p=41
Summary
Whew! If you’ve made it this far, you now know quite a lot about how to approach a site optimization project (and more importantly, how to build your next web site with performance in mind). Remember the general rule of thumb that, when it comes to optimization, you should concentrate on the items with the biggest impact, as opposed to “micro-optimizing”.
You may choose not to implement all the recommendations discussed above, but you can still make quite a difference by focusing on the really low-hanging fruit, such as:
- making fewer HTTP requests by combining components — JavaScript files, style sheets and images (by using CSS Sprites)
- serving all textual content, including HTML, scripts, styles, XML, JSON, and plain text, in a gzipped format
- minifying and placing scripts at the bottom, and style sheets at the top of your files
- using separate cookie-free domains for your components
Wednesday 4 May 2011
asp.net image cache-control example
You want to simplify and improve your HTTP cache headers in your ASP.NET site. Caching with HTTP headers is important to every web site, but there are many complicated rules and conflicts among the headers. Here are lots of notes about HTTP headers and their methods in ASP.NET and the C# language.
First, we know that ASP.NET websites may use ASPX files or ASHX handlers to serve static content like images. Keeping with Yahoo's guidelines, use this ASP.NET C# code to set Expires in the far future.
Description of the code. IIS7 will set the Cache-Control header automatically when you specify SetExpires. No other caching logic is necessary for static resource caching on client browsers. However, there are other options available. Please see the section on Cache-Control headers.
Almost all big websites have certain images that never change, such as logos, shopping cart images, rounded borders and gradients, and navigation bars. Yahoo says to use "the Expires header in the HTTP response to tell the client how long a component can be cached." Please see "Best Practices for Speeding Up Your Web Site" at developer.yahoo.com.
Description. Yahoo describes the example: "This is a far future Expires header, telling the browser that this response won't be stale until April 15, 2010. Note that the time format is very specific and you will need to use a special DateTime format in the C# language to create or test it. Please also see the section on DateTime.
Yahoo recommends the Cache-Control header for dynamic pages. There are several variants of this you can use. Yahoo's best practices: "For dynamic components: use an appropriate Cache-Control header to help the browser with conditional requests." Using Cache-Control gives you overriding power on the cache setting, allowing you to specify options for proxies and the server.
Here we look at Cache-Control headers in ASP.NET. The implementation of caching on Response.Cache is very complex and confusing in ASP.NET, and some options will trigger other options. Setting a page for one hour of caching is done like the following example. As Yahoo states, Cache-Control gives you more control and "helps browsers" with conditional requests.
Here we see how you can use Microsoft's Fiddler tool with HTTP headers. When developing ASP.NET applications with caching, you should use Fiddler, or another equivalent tool, to look at the HTTP headers. I have written material on Fiddler.
Fiddler Tool for HTTP Debugging
In this section, we look at many of the Cache methods you can use in ASP.NET code-behind and other code files. These methods and properties are used to control the HTTP cache settings on your ASP.NET response. They must be called on the HttpResponse object, using the Response.Cache... style syntax.
Expiration Time
You need to call SetCacheability on the Response.Cache to set the main Cache-Control header. This header controls the location and general behavior of the cache. You need to combine this setting with other Cache class method calls to achieve many behaviors. However, these enums define the general setting.
SetCacheability Issue
Private is a term that means the web browser on your users' computers. By using private, your users won't download or re-request the pages they have viewed. This reduces the work your server does and the bandwidth you use. It refuses proxy servers and your own server caches, meaning you still have much CPU use and bandwidth use.
The two HTTP headers both target the client-side caching, but have a semantic difference. Max-Age, part of the Cache-Control, is relative to the current time, making it easier to use in many cases. It "specifies the maximum amount of time that an representation will be considered fresh." Further, "similar to Expires, this directive is relative to the time of the request, rather than absolute."
mnot.net
When looking at the specification for HTTP, you will see that Max-Age and Expires conflict. From the HTTP spec: "If a response includes both an Expires header and a max-age directive, the max-age directive overrides the Expires header."
ietf.org
There are even more complexities when considering proxy caching. I am not certain how common proxy caches are, but when available, they can reduce your bandwidth and improve access times. Basically, they can serve up your pages for you, for free. The Squid software "reduces bandwidth and improves response times by caching and reusing frequently-requested web pages. [It] optimises the data flow between client and server."
squid-cache.org
If you look at the HTTP headers of MySpace, for example, you see the header "Vary: Accept-Encoding". This means that the caches will be separate for each encoding. This improves localization. You can use SetVaryByCustom to change this. Note that this is a suggestion to proxy servers, and does not improve the rate of cache hits.
First, you can use HTTP handlers in ASP.NET for a faster way to server dynamic content than Web Form pages. Handler.ashx is the default name for an ASP.NET generic handler. You need to use the HttpContext parameter and access the Response that way.
ASHX Handler Tutorial
Here we see how you can remove the Cache-Control header in ASP.NET by configuring the application. When you use the Expires header on static resources such as JavaScript, CSS, and images, you do not need the Cache-Control header. Cache-Control and Expires are alternatives and are not both needed. You can disable the HTTP Cache-Control header entirely in Web.config. Note however that this setting is defeated if you change cache headers during execution.
msdn.microsoft.com
As noted above, HTTP dates have a very specific format you must follow. Fortunately, the .NET framework provides a format pattern string for this. You can use a special format string, after converting the date into the current time zone. HTTP has a rigid definition of date formats. For more information on HTTP date formats, such as the RFC1123 pattern, see the Microsoft site.
msdn.microsoft.com
There is a Cache object you can use to store data programmatically. This is separate from the methods shown here, and has many different options. This document focuses on HTTP headers. On the server-side, the Cache[] object is very useful, but it does not address the client-side caching in browsers, such as Firefox, MSIE, and Google Chrome.
There are several different ways to access the Cache. The examples above show how you can access it in the Page class and also from generic handlers. However, Cache is an intrinsic object, and my research shows what happens when you access it.
HttpContext Request Property
Performance of using properties. My research indicates that accessing the Response.Cache property in each method call may not be ideal, and storing the HttpCachePolicy as a variable is better.
Response.Write Test
In this article, we saw how you can use HTTP headers in ASP.NET to greatly enhance the performance of your pages and make them more usable. We did not cover server-side database caching and other complex topics. Instead, we focused on the client-side HTTP headers and client-side caching.
Use the examples here to improve your HTTP headers.
ASP.NET provides many options for HTTP header caching.
Set Expires headers
First, we know that ASP.NET websites may use ASPX files or ASHX handlers to serve static content like images. Keeping with Yahoo's guidelines, use this ASP.NET C# code to set Expires in the far future.
Page that uses Response.Cache [C#]

using System;
using System.Web.UI;

public partial class _Default : Page
{
    protected void Page_Load(object sender, EventArgs e)
    {
	// Set this ASPX response to expire in one year.
 // ... This is essentially 'never'.
	Response.Cache.SetExpires(DateTime.Now.AddYears(1));
    }
}
Description of the code. IIS7 will set the Cache-Control header automatically when you specify SetExpires. No other caching logic is necessary for static resource caching on client browsers. However, there are other options available. Please see the section on Cache-Control headers.
Yahoo: static pages
Almost all big websites have certain images that never change, such as logos, shopping cart images, rounded borders and gradients, and navigation bars. Yahoo says to use "the Expires header in the HTTP response to tell the client how long a component can be cached." Please see "Best Practices for Speeding Up Your Web Site" at developer.yahoo.com.
Example Expires HTTP Header:
Expires: Thu, 15 Apr 2010 20:00:00 GMT
Description. Yahoo describes the example: "This is a far future Expires header, telling the browser that this response won't be stale until April 15, 2010. Note that the time format is very specific and you will need to use a special DateTime format in the C# language to create or test it. Please also see the section on DateTime.
Yahoo: dynamic pages
Yahoo recommends the Cache-Control header for dynamic pages. There are several variants of this you can use. Yahoo's best practices: "For dynamic components: use an appropriate Cache-Control header to help the browser with conditional requests." Using Cache-Control gives you overriding power on the cache setting, allowing you to specify options for proxies and the server.
Use Cache-Control
Here we look at Cache-Control headers in ASP.NET. The implementation of caching on Response.Cache is very complex and confusing in ASP.NET, and some options will trigger other options. Setting a page for one hour of caching is done like the following example. As Yahoo states, Cache-Control gives you more control and "helps browsers" with conditional requests.
Page that uses Response.Cache and Cache-Control [C#]

using System;
using System.Web;
using System.Web.UI;

public partial class _Default : Page
{
    protected void Page_Load(object sender, EventArgs e)
    {
	// Set cache for 1 hour on all computers and servers.
 // ... Proxies, browsers, and your server will cache it.
	Response.Cache.SetCacheability(HttpCacheability.Public);
	Response.Cache.SetMaxAge(new TimeSpan(1, 0, 0));
    }
}
Use Fiddler
Here we see how you can use Microsoft's Fiddler tool with HTTP headers. When developing ASP.NET applications with caching, you should use Fiddler, or another equivalent tool, to look at the HTTP headers. I have written material on Fiddler.
Fiddler Tool for HTTP Debugging
Use Cache methods
In this section, we look at many of the Cache methods you can use in ASP.NET code-behind and other code files. These methods and properties are used to control the HTTP cache settings on your ASP.NET response. They must be called on the HttpResponse object, using the Response.Cache... style syntax.
Expiration Time
AddValidationCallback
You will need this when using callbacks, which I have no experience with.
AppendCacheExtension
You can use this to add a custom header to the Cache-Control header, which could be used for future changes in HTTP 1.1 or proprietary options.
SetAllowResponseInBrowserHistory
This overrides certain settings made by SetCacheability, such as NoCache and ServerAndNoCache.
SetCacheability
This is important and sets the Cache-Control header, which is the preferred mechanism for caching dynamic pages. See the list of HttpCacheability enums below.
SetETag
This allows you to specify a string that is considered the 'tag' of a resource. This is not recommended by Yahoo and not normally needed.
SetETagFromFileDependencies
Tells ASP.NET to assign random etags to your resources that are keyed to the file contents. Simplifies ETag usage. Not normally needed.
SetExpires
Very important and useful for static resources such as logo images or web site layout images. Recommended by Yahoo for static resources.
SetLastModified
This can be used to date your file and return a 304 when a user requests the same one again. This doesn't save an HTTP request. Yahoo recommends modified dates over ETags.
SetLastModifiedFromFileDependencies
Same as above but tells ASP.NET to read in the file metadata automatically.
SetMaxAge
Very important. This gives you a relative time window you can specify a resource can be cached for. This is an alternative to the Expires header, and it overrides the Expires header.
SetNoServerCaching
This seems to remove the HttpCacheability.Server setting. It seems like a really poor design in ASP.NET.
SetNoStore
Applies the "Cache-Control: no-store" header. This is useful for advertisements and dynamic responses.
SetNoTransforms
Some proxy caches can change the format of your files when they store them. This setting should tell them not to.
SetOmitVaryStar
Changes header when using vary parameters. Not often useful.
SetProxyMaxAge
Not likely to be useful. It suggests that proxy caches can expire or keep resources for a specific time. I doubt they would honor this exactly.
SetRevalidation
Indicates when validation should occur. See Cache-Control header section.
SetSlidingExpiration
Changes the logic of when the server expires its cache. Has many quirks and you must test it carefully.
SetValidUntilExpires
Don't listen to browsers when they say a resource is expired or stale. Otherwise, they can invalidate caches.
SetVaryByCustom
Allows you to set the custom vary header, which is useful when you have the Vary header. See section on Vary.
VaryByContentEncodings
VaryByHeaders
VaryByParams
These are public getters only, meaning you cannot set these properties. They are useful for debugging and diagnostics of your Vary header.
HttpCacheability constants
You need to call SetCacheability on the Response.Cache to set the main Cache-Control header. This header controls the location and general behavior of the cache. You need to combine this setting with other Cache class method calls to achieve many behaviors. However, these enums define the general setting.
SetCacheability Issue
HttpCacheability.NoCache
Tells the browser, the server, and proxies to never cache this resource. This can be useful for advertisements and resources that are always changing.
HttpCacheability.Private
Only cache on the browser. This will provide bandwidth savings for your users, but your server won't store a cached copy of the output. This is adequate for many sites.
HttpCacheability.Public
The ultimate cache setting: tells the server to save the page, proxy caches to save the page, and the browser to save the page.
HttpCacheability.Server
Only cache the page on the server (output caching without browser caching). However, when your visitors click on your static pages, they will be reloaded.
HttpCacheability.ServerAndNoCache
The same as NoCache except it allows the server to store the page. Has slightly different meaning for remote clients and proxies. Not often useful.
HttpCacheability.ServerAndPrivate
Tells proxy caches to never cache this page, but to allow the browser and the server to cache it.
Private caches
Private is a term that means the web browser on your users' computers. By using private, your users won't download or re-request the pages they have viewed. This reduces the work your server does and the bandwidth you use. It refuses proxy servers and your own server caches, meaning you still have much CPU use and bandwidth use.
Expires and Max-Age
The two HTTP headers both target the client-side caching, but have a semantic difference. Max-Age, part of the Cache-Control, is relative to the current time, making it easier to use in many cases. It "specifies the maximum amount of time that an representation will be considered fresh." Further, "similar to Expires, this directive is relative to the time of the request, rather than absolute."
mnot.net
Max-Age overrides Expires
When looking at the specification for HTTP, you will see that Max-Age and Expires conflict. From the HTTP spec: "If a response includes both an Expires header and a max-age directive, the max-age directive overrides the Expires header."
ietf.org
Public proxy caches (Squid)
There are even more complexities when considering proxy caching. I am not certain how common proxy caches are, but when available, they can reduce your bandwidth and improve access times. Basically, they can serve up your pages for you, for free. The Squid software "reduces bandwidth and improves response times by caching and reusing frequently-requested web pages. [It] optimises the data flow between client and server."
squid-cache.org
Vary header
If you look at the HTTP headers of MySpace, for example, you see the header "Vary: Accept-Encoding". This means that the caches will be separate for each encoding. This improves localization. You can use SetVaryByCustom to change this. Note that this is a suggestion to proxy servers, and does not improve the rate of cache hits.
Handler.ashx cache
First, you can use HTTP handlers in ASP.NET for a faster way to server dynamic content than Web Form pages. Handler.ashx is the default name for an ASP.NET generic handler. You need to use the HttpContext parameter and access the Response that way.
ASHX Handler Tutorial
HTTP Handler that uses caching [C#]

<%@ WebHandler Language="C#" %>

using System;
using System.Web;

public class Handler : IHttpHandler {

    public void ProcessRequest (HttpContext context) {
	// Cache this handler response for 1 hour.
	HttpCachePolicy c = context.Response.Cache;
	c.SetCacheability(HttpCacheability.Public);
	c.SetMaxAge(new TimeSpan(1, 0, 0));
    }

    public bool IsReusable {
	get {
	    return false;
	}
    }
}
Remove Cache-Control
Here we see how you can remove the Cache-Control header in ASP.NET by configuring the application. When you use the Expires header on static resources such as JavaScript, CSS, and images, you do not need the Cache-Control header. Cache-Control and Expires are alternatives and are not both needed. You can disable the HTTP Cache-Control header entirely in Web.config. Note however that this setting is defeated if you change cache headers during execution.
msdn.microsoft.com
Example Web.config [C#]

<?xml version="1.0"?>
<configuration>
    <appSettings/>
    <connectionStrings/>
    <system.web>
	<httpRuntime sendCacheControlHeader="false"/>
    <!-- etc. -->
Convert DateTime
As noted above, HTTP dates have a very specific format you must follow. Fortunately, the .NET framework provides a format pattern string for this. You can use a special format string, after converting the date into the current time zone. HTTP has a rigid definition of date formats. For more information on HTTP date formats, such as the RFC1123 pattern, see the Microsoft site.
msdn.microsoft.com
Page that converts DateTime [C#]

using System;
using System.Web.UI;

public partial class _Default : Page
{
    protected void Page_Load(object sender, EventArgs e)
    {
	DateTime d = DateTime.UtcNow;
	string s = d.ToUniversalTime().ToString("r");
	Response.Write(s);
    }
}
Other cache methods
There is a Cache object you can use to store data programmatically. This is separate from the methods shown here, and has many different options. This document focuses on HTTP headers. On the server-side, the Cache[] object is very useful, but it does not address the client-side caching in browsers, such as Firefox, MSIE, and Google Chrome.
Use Response.Cache
There are several different ways to access the Cache. The examples above show how you can access it in the Page class and also from generic handlers. However, Cache is an intrinsic object, and my research shows what happens when you access it.
HttpContext Request Property
Performance of using properties. My research indicates that accessing the Response.Cache property in each method call may not be ideal, and storing the HttpCachePolicy as a variable is better.
Response.Write Test
Summary
In this article, we saw how you can use HTTP headers in ASP.NET to greatly enhance the performance of your pages and make them more usable. We did not cover server-side database caching and other complex topics. Instead, we focused on the client-side HTTP headers and client-side caching.
Windows Server Hacks: Remotely Enable Remote Desktop
Remote Desktop is a cool feature of Windows Server 2003 that lets you remotely log on to and work at a machine as if you were seated at the local console (in Windows 2000 Advanced Server, this feature was called Terminal Services in Remote Administration Mode). Remote Desktop can be a lifesaver for fixing problems on servers at remote sites, but what if you forgot to enable the feature before you shipped the server out to Kalamazoo? Enabling Remote Desktop is easy if the server is in front of you: just log on as an administrator, open System in Control Panel, select the Remote tab, and under Remote Desktop select the checkbox labeled "Allow users to connect remotely to this computer." Unfortunately, you can't use the System utility to enable Remote Desktop on a remote machine, though you can access some properties pages of System using Computer Management by first connecting the console to a remote computer, then right-clicking on the root node and selecting Properties. Unfortunately, as you can see in Figure 1 below, the Remote tab is not available when you access System properties this way on a remote machine (here named SRV220).

Figure 1. System properties for a remote machine does not have Remote tab.
Fortunately, there's a workaround. Sit down at your desk and log on to your Windows XP workstation using your administrator credentials and start Registry Editor by Start --> Run --> regedit --> OK. Then select the Connect Network Registry option under the File menu (Figure 2).

Figure 2. Connecting to the Registry on a remote machine.
This opens the Select Computer search box. Either browse Active Directory to locate the remote server, or type its name in the textbox (Figure 3).

Figure 3. Connecting to the Registry on a remote server named SRV220.
Click OK and a node will be displayed in Registry Editor for the remote machine (Figure 4).

Figure 4. HKLM and HKU hives on SRV220.
Now browse

Figure 5. Registry key for Terminal Server on remote machine.
Under the Terminal Server key, you'll find a

Figure 6. Set
The remote machine needs to be rebooted for the change to take effect, so open a command prompt and type the following command:
After the remote machine reboots, Remote Desktop should be enabled on it. To test this from your workstation, open Start --> All Programs --> Accessories --> Communications --> Remote Desktop Connection, enter the name of the remote server in the Remote Desktop Connection logon box, supply your administrator password when prompted, and you're in.
Figure 1. System properties for a remote machine does not have Remote tab.
Fortunately, there's a workaround. Sit down at your desk and log on to your Windows XP workstation using your administrator credentials and start Registry Editor by Start --> Run --> regedit --> OK. Then select the Connect Network Registry option under the File menu (Figure 2).
Figure 2. Connecting to the Registry on a remote machine.
This opens the Select Computer search box. Either browse Active Directory to locate the remote server, or type its name in the textbox (Figure 3).
Figure 3. Connecting to the Registry on a remote server named SRV220.
Click OK and a node will be displayed in Registry Editor for the remote machine (Figure 4).
Figure 4. HKLM and HKU hives on SRV220.
Now browse
HKLM on SRV to find the following Registry key (Figure 5).HKLM\SYSTEM\CurrentControlSet\Control\Terminal ServerFigure 5. Registry key for Terminal Server on remote machine.
Under the Terminal Server key, you'll find a
REG_DWORD value named fDenyTSConnection. Double-click on that value to open the Edit DWORD Value box and change the value data from 1 (Remote Desktop disabled) to 0 (Remote Desktop enabled), as in Figure 6 below.Figure 6. Set
fDenyTSConnections to 0 to enable Remote Desktop on SRV220.The remote machine needs to be rebooted for the change to take effect, so open a command prompt and type the following command:
shutdown -m \\srv220 -rAfter the remote machine reboots, Remote Desktop should be enabled on it. To test this from your workstation, open Start --> All Programs --> Accessories --> Communications --> Remote Desktop Connection, enter the name of the remote server in the Remote Desktop Connection logon box, supply your administrator password when prompted, and you're in.
Monday 2 May 2011
C#: Connect To Oracle Database With No Oracle Client Install Needed (Winform DataGridView Loading Example)
 This article demonstrates in a step by step fashion the easiest, and frankly fastest way to connect to an Oracle database using C#. The goal is to not have to install the huge Oracle Client either on the development machine nor the target machine the code will run on. This example creates a winform and inserts the content into a DataGridView for quick viewing. The code below is base on .Net 3.5.
Steps
- Oracle has an Oracle Database Instant Client which is a set of Dlls which can be XCopy installed onto the development and target PC to allow Oracle database access without installing the full Oracle client. In future steps we will include those target Dlls to be copied to the target output folder with the executable. Download the appropriate package and add Dlls to a folder of your choice on the PC.
- In Visual Studio create a Winform Project. From the Solution Explorer and within the project create a subfolder named Oracle Dlls. Update: This step should not be done, for the dlls will end up being copied into a subfolder of the same name and when running the client an error may come up stating “System.Data.OracleClient requires Oracle client software
version 8.1.7 or greater”. - Add the reference to the project of System.Data.OracleClient to the project..
- In Studio again select the folder created in step 2 (highlight the project root) and from the right click menu select Add->Existing Item, and insert all the top level Oracle Dlls from step one into the directory into the folder project. Note the below picture shows into a folder, they do not go into a folder but at the root of the project.

- Highlight all the inserted DLLs and select Properties to bring up the properties window. Change the Build Action to be Content and the Copy To Output Directory to be Copy If Newer. This allows the dlls to reside with the created executable program. By doing this it allows the program to run on another computer, as well as this one, that does not have the Oracle Client installed because all the Oracle specific dlls reside with the output executable.
- On the design view of the form add a button, label, binding source and a DataGridView. The names used for each in the example (Label as lbState, Binding Source as bsOracle and DataGridView as gvOracle).
- Create in the forms code a method to handle the connection string and add the target Oracle db/instance items (Note: Replace { xxx } including the curly braces the specifics to your db) :
privatestringGenerateConnectionString(){return"Data Source=( DESCRIPTION = ( ADDRESS_LIST = ( ADDRESS = ( PROTOCOL = TCP )( HOST = {Insert Host Here} )( PORT = {Insert Port Here} ) ) )( CONNECT_DATA = ( SERVER = DEDICATED )( SERVICE_NAME = {Service Name Here } ) ) ); User Id= {DB ID Here}; Password = {Password Here};";} - In the button’s onclick event wire up the controls and access the Oracle database as such:
try{using( OracleConnection connection =newOracleConnection( GenerateConnectionString() ) ){connection.Open();lblState.Text = connection.State.ToString();OracleCommand oc = connection.CreateCommand();oc.CommandText ="SELECT * FROM {Your Table Here}";OracleDataReader reader = oc.ExecuteReader();bsOracle.DataSource = reader;gvOracle.DataSource = bsOracle;gvOracle.BorderStyle = BorderStyle.Fixed3D;gvOracle.AutoSizeColumnsMode = DataGridViewAutoSizeColumnsMode.AllCells;}}catch( Exception ex ){// MessageBox.Show( "Exception: " + ex.Message );lblState.Text = ex.Message;} - Run and compile the program and if all goes well it should attach…but there are other possible failure points see the next section as to a couple of them.

Note for a more involved explanation of this process check out the article Instant Oracle Using C# which has a console example and does not provide the advice of using the build options in Studio for the Oracle Dlls. That will be our little secret. HTH
Possible Errors Encountered
System.Data.OracleClient requires Oracle client software version 8.1.7 or greater
If this is encountered it could be a permission problem accessing the location where the oracle dlls are…but most likely the dlls are not in the same directory as the executable or found within the environment path of the system.
ORA-12541: TNS:no listener
This one could mean that one of the connection settings is incorrect and the database could not be connected to and this generic error comes back. Try tweaking the settings, port, instance
Subscribe to:
Posts (Atom)